Background
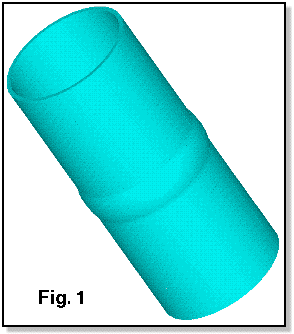
A client had been manufacturing aluminum drive shaft tubes for vans and full sized cars. These shafts had a bulge in the wall which controlled where the shaft would collapse during a collision (see Fig. 1). The reason for controlling the buckle location was to ensure that the bending shaft did not pierce the fuel tank.

However, newer models were planned with more powerful engines. This necessitated a thicker wall which led to an increased collapse load. The shape of the bulge was redesigned with the following objectives:
- The collapse load of the new shaft must match that of the old
- The tooling must be retained with minimal alteration
- The outer surface of the bulge must stay within the envelope dictated by the client
Description
This part was manufactured by enclosing the tubular extrusion in a two piece die whose inner surface matched the outer contour of the bulge. A flexible, polymer plug was inserted into the tube and compressed from the ends. This forced the tube walls outward into the die to form the desired shape.
Design objective 1 pointed to a change in the geometry of the bulge. In effect, the idea was to weaken the shaft by a specified amount. Objective 2 dictated that the new shape should not require that additional metal be added to the tooling. Only machining of the tooling would be allowed.
Due to the relatively simple geometry of the drive shaft, a two dimensional, axisymmetric model of the bulge was created. The area encompassed by the model is represented by the purple area of the cutaway view in Fig. 2. Note that the drive shaft was much longer than shown in the figure. Since the bulge was symmetric about its highest point, only half of it needed to be modeled.

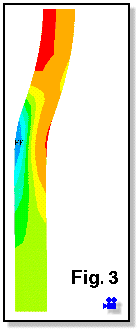
Forces were applied to the ends of the shaft, and the stresses were examined. Fig. 3 shows the stresses in a partially loaded shaft. They progress from low values (blue) to plastically deformed (red). Move your mouse over the figure below to see an animation of the simulation (requires javascript). Once the plastic zone penetrated to the surface, collapse was imminent.

Nearly a dozen different configurations were considered. These included both symmetric and nonsymmetric bulge shapes. In the end, a shape was found which the model indicated would meet all the design requirements. This shape was deeper than the original, though still within the dimensional envelope, and had sharper radii.
Conclusions
The refined shape was submitted to the client. The tooling was
modified according to the recommendations, and tests were performed on the
new shaft. They were certified and went into production immediately. The
original tooling was used with minor modification, and the simulations avoided
costly trial and error attempts to redesign the drive shaft.
|
Copyright © 2000 - 2018 Nonlinear Engineering, LLC |

|
Page last updated 05 July 2018 |